
Combining the iconic flavor of red velvet cake with the creamy richness of cheesecake, red velvet cheesecake brownies are a dessert lover’s dream.
These brownies are not just visually stunning but are also incredibly easy to make at home.
Whether you’re preparing them for a special occasion like Valentine’s Day or just to satisfy your sweet tooth, this recipe guarantees delicious results every time.
Key Takeaways
- Red velvet cheesecake brownies are a fusion of fudgy brownies, tangy cream cheese, and classic red velvet flavors.
- Simple ingredients like cocoa powder, cream cheese, and red food coloring create this masterpiece.
- Master the art of swirling cheesecake into the red velvet layer for a bakery-style finish.
- Learn how to store and freeze brownies to keep them fresh for days.
What Are Red Velvet Cheesecake Brownies?
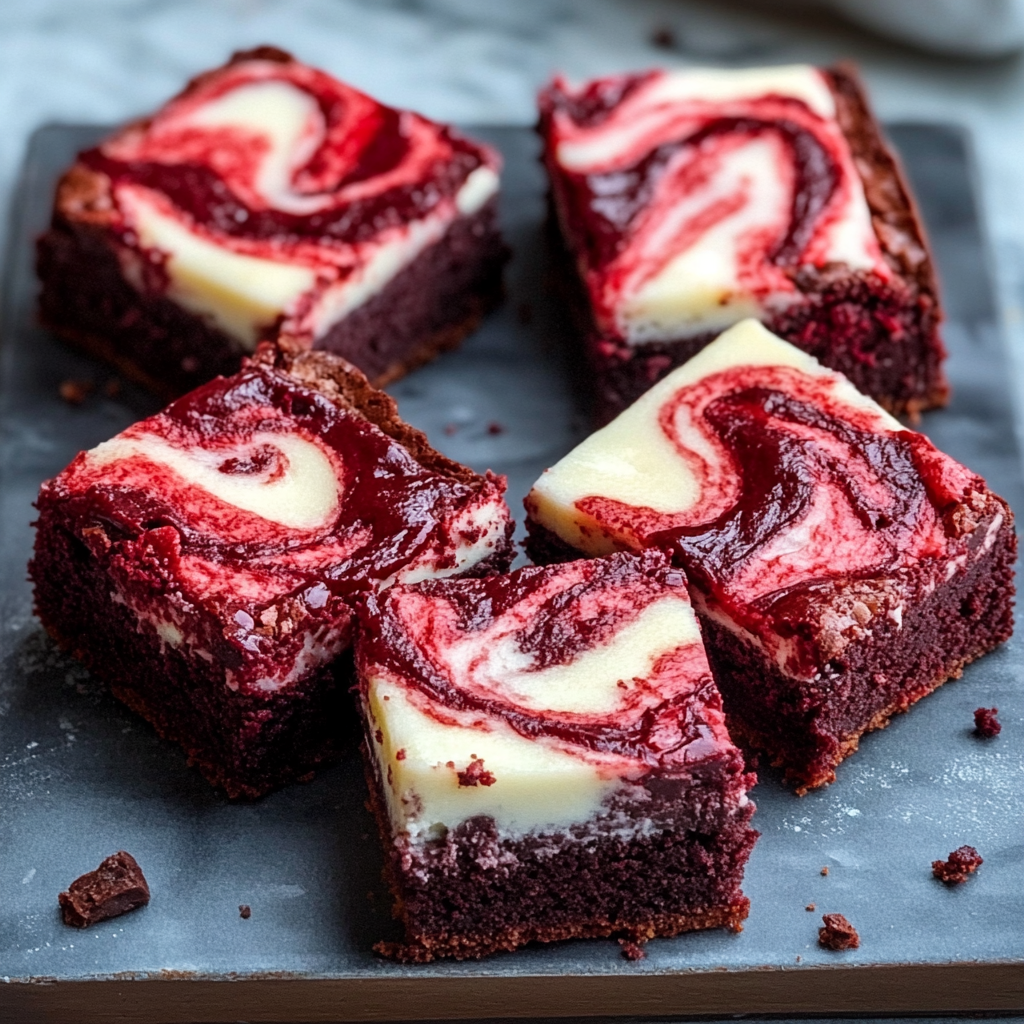
Red velvet cheesecake brownies are an innovative twist on two classic desserts: red velvet cake and creamy cheesecake.
This dessert features a rich, chocolatey brownie base infused with the vibrant color and subtle tang of red velvet.
On top, a luscious layer of cheesecake adds creaminess, while the swirls create a visually stunning presentation.
Why They’re Popular
Red velvet has always been synonymous with indulgence.
The addition of cheesecake takes it to another level, making these brownies perfect for holidays, birthdays, or any day when you need a little extra sweetness in life.
Ingredients for Red Velvet Cheesecake Brownies
Creating the perfect batch of red velvet cheesecake brownies starts with choosing the right ingredients.
Red Velvet Layer
- Flour: All-purpose flour works best for a sturdy yet soft texture.
- Cocoa Powder: Gives the brownies their chocolate undertones.
- Butter: Unsalted butter provides richness.
- Sugar: Granulated sugar for sweetness.
- Eggs: Acts as a binder and adds moisture.
- Red Food Coloring: Liquid or gel works for that signature color.
- Vanilla Extract: Enhances the red velvet flavor.
Cheesecake Layer
- Cream Cheese: Full-fat cream cheese creates a creamy topping.
- Sugar: Adds the right amount of sweetness.
- Egg: Helps create a smooth texture.
- Vanilla Extract: Complements the tang of cream cheese.
Optional Add-Ins
- Chocolate Chips: For extra bursts of chocolate.
- Nuts: Pecans or walnuts add a delightful crunch.
How to Make Red Velvet Cheesecake Brownies
Creating these stunning red velvet cheesecake brownies is easier than you might think! With a little attention to detail and patience, you’ll have a batch of irresistible treats ready in no time.
Step-by-Step Instructions
1. Prepare the Red Velvet Brownie Layer
- Melt the Butter: In a microwave-safe bowl, melt 1/2 cup of unsalted butter. Let it cool slightly.
- Mix Wet Ingredients: Stir in 1 cup of granulated sugar, 2 large eggs, 1 teaspoon of vanilla extract, and 2 tablespoons of red food coloring. Mix well until smooth.
- Combine Dry Ingredients: In another bowl, sift together 3/4 cup of all-purpose flour, 2 tablespoons of cocoa powder, and a pinch of salt. Gradually fold the dry mixture into the wet ingredients, ensuring no lumps.
- Set Aside: Pour the mixture into a greased or parchment-lined 8×8-inch baking pan, reserving about 1/4 cup of the batter for swirling later.
2. Make the Cheesecake Layer
- Beat the Ingredients: In a mixing bowl, combine 8 ounces of softened cream cheese, 1/4 cup of granulated sugar, 1 large egg, and 1 teaspoon of vanilla extract. Beat until the mixture is smooth and creamy.
3. Assemble and Swirl
- Layer the Cheesecake: Pour the cream cheese mixture over the red velvet layer in the pan. Spread evenly with a spatula.
- Swirl the Layers: Drop spoonfuls of the reserved red velvet batter onto the cheesecake layer. Use a toothpick or knife to create beautiful swirls.
4. Bake
- Preheat and Bake: Bake in a preheated oven at 350°F (175°C) for 30–35 minutes or until the center is set and the edges start to pull away from the pan.
- Cool Completely: Allow the brownies to cool at room temperature before slicing. For best results, chill them in the refrigerator for 1–2 hours before cutting.
Expert Tips for Perfect Red Velvet Cheesecake Brownies
Achieving perfection with red velvet cheesecake brownies takes a little finesse. Here are some pro tips to help:
- Prevent Overbaking: Check the brownies early. Overbaking can lead to dry edges and cracks in the cheesecake layer.
- Room Temperature Ingredients: Use room temperature cream cheese and eggs for a smooth cheesecake mixture.
- Food Coloring: Use gel food coloring for a more vibrant red without altering the batter’s consistency.
- Perfect Swirls: Swirl gently to avoid mixing the layers completely. This ensures a stunning marbled effect.
Storage and Serving Suggestions
These red velvet cheesecake brownies taste just as good the next day! Here’s how to keep them fresh:
Storing
- Refrigerator: Store brownies in an airtight container in the fridge for up to 5 days.
- Freezer: Wrap individual brownies tightly in plastic wrap and place them in a freezer-safe container. They’ll keep for up to 2 months.
Serving
- Warm: Heat in the microwave for 10–15 seconds for a gooey texture.
- Cold: Serve chilled for a firmer bite and a more pronounced cheesecake flavor.
- With Toppings: Pair with whipped cream, ice cream, or a drizzle of chocolate syrup for extra indulgence.
Variations to Try
Take your red velvet cheesecake brownies to the next level with these creative variations:
- Chocolate Lovers: Add mini chocolate chips to the red velvet batter.
- Nutty Twist: Swirl in peanut butter or sprinkle chopped pecans on top before baking.
- Fruit Flavor: Add a raspberry or strawberry swirl to the cheesecake layer for a fruity burst.
- Gluten-Free Option: Use gluten-free all-purpose flour for a celiac-friendly treat.
FAQs
What’s the Best Food Coloring for Red Velvet Brownies?
Gel food coloring is ideal as it provides intense color without altering the texture of the batter. Liquid food coloring works too but may require more for the same vibrancy.
Can I Make These Without Food Coloring?
Yes! Substitute with natural alternatives like beetroot powder or pomegranate juice. The color may differ, but the flavor will remain delicious.
How Do I Know When the Brownies Are Done?
The edges should look set, and the center should have a slight jiggle. Use a toothpick inserted into the brownie layer (not the cheesecake) to check doneness.
Can I Use a Boxed Mix for the Brownie Layer?
Absolutely! Customize the boxed mix by adding red food coloring and following the cheesecake layer instructions in this guide.
Conclusion
Red velvet cheesecake brownies are more than just a dessert—they’re an experience.
Their rich red velvet base, creamy cheesecake layer, and beautiful swirls make them a standout treat for any occasion.
With the right ingredients, simple techniques, and a touch of creativity, you can create a dessert that looks bakery-perfect and tastes divine.
Whether you’re sharing them at a holiday party, gifting them to loved ones, or indulging on a quiet evening, these brownies are sure to impress.
So, grab your apron and get baking! Once you take that first bite, you’ll see why red velvet cheesecake brownies are a dessert you’ll return to time and again.