
If you’re a pizza lover looking for a fun, bite-sized twist on the classic slice, parmesan garlic pizza rolls are about to become your obsession. Combining the unmatched flavor of garlic and parmesan with the irresistible appeal of ooey, gooey cheese wrapped in crispy dough, these pizza rolls are perfect for game day, family movie nights, or satisfying your snack cravings.
Not only are crispy parmesan pizza bites delicious, but they’re also surprisingly easy to make at home. This guide will take you through each step—along with tips for customization—to create the ultimate crowd-pleaser. Grab your apron and get ready to impress!
Ingredients You’ll Need
Before you get started, gather everything you need for this simple and scrumptious recipe.
the dough (or use store-bought pizza dough for convenience):
- 2 1/4 teaspoons active dry yeast (one packet)
- 1 cup warm water (110°F)
- 2 1/2 to 3 cups all-purpose flour
- 1 teaspoon sugar
- 1 teaspoon salt
- 2 tablespoons olive oil
the filling:
- 1 cup shredded mozzarella cheese
- 1/2 cup marinara or pizza sauce for spreading
- 1/3 cup grated parmesan cheese
- 1 teaspoon garlic powder
- 1 teaspoon Italian seasoning (dried basil, oregano, thyme)
the garlic butter topping:
- 1/4 cup unsalted butter, melted
- 2 teaspoons minced garlic or garlic powder
- 1/4 cup freshly grated parmesan cheese
- 2 tablespoons chopped fresh parsley (optional, for garnish)
Tools:
- Rolling pin
- Baking sheet or pizza stone
- Parchment paper or cooking spray
- Pastry brush
Step-by-Step Instructions to Make Parmesan Garlic Pizza Rolls
Follow these steps to create pizza perfection in roll form. Whether you’re making the dough from scratch or taking a shortcut with store-bought, your taste buds will thank you.
1. Prepare the Dough
If you’re making dough from scratch:
- Activate the yeast: Combine the warm water and sugar in a large mixing bowl. Sprinkle in the yeast and give it a gentle stir. Let it sit for about 5-10 minutes until it becomes frothy.
- Mix the ingredients: Add olive oil, salt, and 2 1/2 cups of flour to the yeast mixture. Stir until it forms a rough dough. Transfer to a floured surface and knead, adding more flour as needed, until the dough is smooth and elastic (about 8-10 minutes).
- Rest the dough: Place the dough in a lightly oiled bowl, cover with a clean kitchen towel, and leave it to rise in a warm spot for 1-1.5 hours or until it has doubled in size.
If you’re using store-bought pizza dough:
- Let the dough sit out at room temperature for 20 minutes to make it more pliable.
2. Preheat Your Oven
Preheat your oven to 400°F (200°C). Line a baking sheet with parchment paper or lightly grease with cooking spray.
3. Roll Out the Dough
On a floured surface, roll the dough into a rectangle that’s about 12×8 inches. Aim for an even thickness to ensure uniform baking.
4. Add the Filling
- Spread a thin layer of pizza sauce evenly onto the dough, leaving about a half-inch border around the edges.
- Sprinkle the shredded mozzarella cheese, grated parmesan, garlic powder, and Italian seasoning over the sauce.
5. Roll and Cut
- Starting from the long edge of the rectangle, carefully roll the dough into a tight log.
- Using a sharp knife or pizza cutter, slice the roll into 12 even pieces.
6. Arrange and Prepare for Baking
- Place the rolls cut side up on the prepared baking sheet, leaving a little space between each one.
- Brush the tops with melted butter to enhance browning.
7. Bake to Perfection
Bake the rolls in the preheated oven for 15-18 minutes, or until golden brown and bubbly. While they’re baking, prepare the garlic butter topping.
8. Add the Garlic Butter Topping
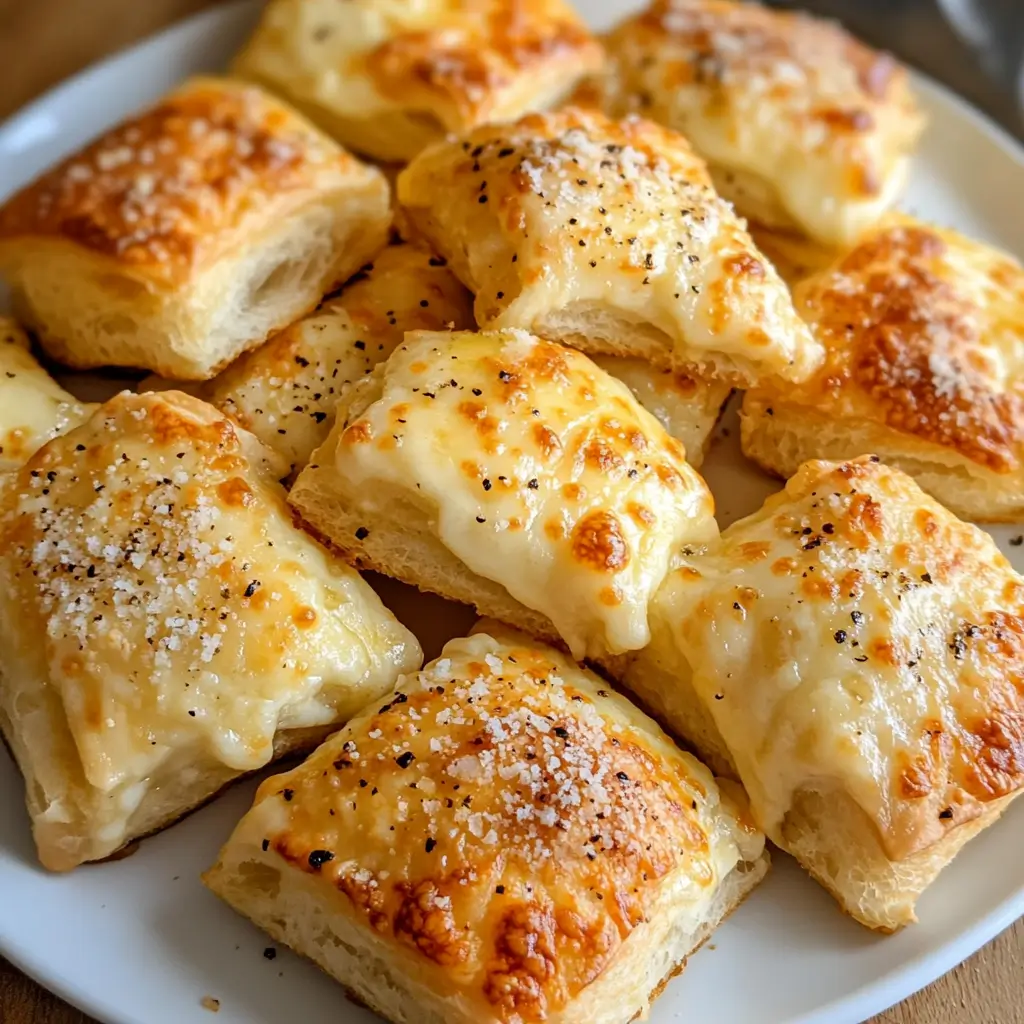
Once the rolls are out of the oven, use a pastry brush to coat them generously with the melted butter mixed with minced garlic. Sprinkle grated parmesan and fresh parsley on top for extra flavor and visual appeal.
Tips and Tricks for Perfect Parmesan Garlic Pizza Rolls
- Get creative with fillings: Swap out mozzarella for cheddar, add pepperoni slices, or experiment with mushrooms, spinach, or cooked sausage.
- Avoid soggy rolls by using a light hand with the sauce and keeping it away from the edges of the dough.
- Make ahead: Assemble your rolls the night before and refrigerate them on the baking sheet covered with plastic wrap. Bake them fresh when you’re ready to serve.
- Elevate the flavors with a drizzle of truffle oil or sprinkle of red chili flakes just before serving.
How to Serve Parmesan Garlic Pizza Rolls
Now that your rolls are warm and ready, it’s time to think about presentation and pairings. Here are some ideas to turn your pizza rolls into a complete experience:
- With dipping sauces:
-
- Marinara sauce for a classic pairing
- Ranch dressing for a creamy twist
- Garlic aioli for an extra garlicky indulgence
- Serve with salad:
-
- Balance the richness with a fresh side of arugula or a Caprese salad.
- Perfect for parties:
-
- Arrange the rolls on a platter with the dipping options in small bowls.
These rolls are also a fantastic companion to a pizza night spread. Serve them alongside your favorite pizza or as an appetizer before the main course.
Take Your Pizza Game to the Next Level
There’s something magical about taking a classic like pizza and transforming it into these flavor-packed rolls. cheesy garlic rolls are indulgent, easy to customize, and perfect for so many occasions.
Try this recipe at home and share it with fellow pizza lovers. We’d love to hear how your rolls turn out—whether you made them for game day, a dinner party, or just a weeknight treat. If you’re craving more delicious ideas and kitchen inspiration, stay tuned for more recipes on our blog!
Storing and Reheating Parmesan Garlic Pizza Rolls
If you manage to have any leftovers, proper storage and reheating can ensure your pizza rolls stay delicious for days.
- To store:
-
- Allow the rolls to cool completely before storing them. Place them in an airtight container or resealable plastic bag and refrigerate for up to 3 days.
- For longer storage, freeze the rolls in a single layer on a baking sheet until solid, then transfer them to a freezer-safe bag or container. They can be frozen for up to 2 months.
- To reheat:
-
- For refrigerated rolls, preheat your oven to 350°F (175°C), place the rolls on a baking sheet, and warm them for about 8-10 minutes, or until heated through.
- For frozen rolls, either thaw them overnight in the refrigerator before reheating or bake directly from frozen at 350°F (175°C) for 15-18 minutes.
- Avoid microwaving the rolls, as this can make them soggy and reduce their texture and flavor.
Reheated pizza rolls are almost as good as freshly baked, making them an ideal make-ahead snack or party option.
Variations to Try
One of the best things about Parmesan garlic pizza rolls is how easily adaptable they are to your preferences. Here are some creative variations to keep things fresh and exciting:
- Pesto Delight:
Swap out the pizza sauce for basil pesto and add a sprinkle of sun-dried tomatoes or toasted pine nuts for a Mediterranean twist.
- BBQ Chicken Rolls:
Replace the pizza sauce with barbecue sauce, add shredded rotisserie chicken, and finish with red onion slices and smoked gouda cheese for a bold flavor combination.
- Spicy Jalapeño Rolls:
Kick up the heat by mixing sliced jalapeños with a blend of sharp cheddar and pepper jack cheese. Add a drizzle of hot sauce for spice lovers.
- Breakfast Rolls:
Transform these into a morning treat by using scrambled eggs, crumbled cooked bacon, and cheddar cheese as the filling. Pair them with a side of maple syrup for dipping.
- Vegetarian Supreme:
Load up on all your favorite veggie toppings, such as diced bell peppers, black olives, spinach, and artichoke hearts, combined with mozzarella and feta cheese.
With these variations, you can reinvent the classic Parmesan Garlic Pizza Bites to suit any occasion or craving. Feel free to experiment and create your own signature version!
Frequently Asked Questions About Parmesan Garlic Pizza Rolls
If you’re new to making pizza rolls or have a few questions, this section is here to help. Below are some common inquiries about the recipe, along with tips to ensure your baking experience is a success.
Can I use store-bought dough?
Absolutely! While homemade dough adds a personal touch, store-bought pizza dough is a convenient option that works just as well. Choose a high-quality brand to ensure great flavor and texture.
What’s the best type of cheese to use?
Mozzarella is the classic choice because of its meltability and mild flavor, but don’t hesitate to try other cheeses like provolone, gouda, or even a blend of your favorites. Just make sure to avoid overly soft cheeses that may make the rolls too runny during baking.
How do I prevent the rolls from sticking to the baking sheet?
Using parchment paper or a silicone baking mat is highly recommended as it ensures easy cleanup and prevents sticking. If you don’t have either, lightly grease the baking sheet with oil or non-stick cooking spray.
Can I make these gluten-free?
Yes, you can use gluten-free pizza dough to accommodate dietary preferences or restrictions. Be sure to follow the specific handling and baking instructions provided with the gluten-free dough.
How can I make the rolls crispier?
For a crispy exterior, increase the oven temperature slightly, to 375°F (190°C), and bake the rolls on the lower rack of the oven. You can also finish them under the broiler for 1-2 minutes for a golden, crunchy finish. Just be sure to watch them closely to avoid burning.
Are these rolls kid-friendly?
Kids absolutely love these! The cheesy, garlicky goodness is a hit for little ones, and you can even invite them to help assemble the rolls. For a kid-friendly twist, consider adding ingredients like ham or pineapple to cater to their tastes.
What’s the best way to transport pizza rolls for a party?
Bake the rolls as directed, allow them to cool slightly, and then layer them in a covered, insulated container to keep them warm. If reheating is an option at the party, follow the reheating tips provided earlier for the best results.
By addressing these questions, we hope to make the process of making Cheesy Garlic Parmesan Rolls even easier and more enjoyable for everyone. Whether you’re a seasoned baker or trying this recipe for the first time, the end result is bound to be delicious!