
Easter is a time filled with family traditions, colorful celebrations, and, most importantly, delicious desserts! Among the delightful treats that take center stage during Easter gatherings, the Easter Jell-O Pie stands out as a vibrant and fun dessert that is as visually appealing as it is delicious. Whether you’re a holiday baker, a dessert enthusiast, or simply someone looking for a fresh twist on Easter desserts, this guide will show you how to create the perfect Easter Jell-O Pie, step by step.
This blog will cover a brief history of Jell-O, walk you through the recipe, provide tips for perfecting your pie, and explore exciting variations. By the end, you’ll have all the knowledge you need to make this colorful treat a staple of your Easter celebrations!
A Brief History of Jell-O and Its Easter Connection
Jell-O, first introduced in 1897, has been a beloved dessert ingredient for over a century. This sweet, wobbly treat burst onto the food scene with its vibrant colors, versatile applications, and affordability. By the mid-20th century, it was gracing tables across America at potlucks, family dinners, and holiday celebrations.
At Easter, Jell-O takes on a unique significance—its bright colors and customizable flavors perfectly represent the joy and renewal of the season. Families incorporate it into various whimsical dessert creations, with the Jell-O Pie emerging as an unmistakable classic. With layers of creamy, fruity goodness and its pastel, jewel-toned hues, it adds a festive yet nostalgic touch to any Easter feast.
Now that we know why Jell-O is the perfect ingredient for Easter desserts, let’s roll up our sleeves and get baking!
Easter Jell-O Pie Recipe (Step-by-Step)
Ingredients
Here’s what you’ll need to create your Easter Jell-O Pie:
- 1 pre-made graham cracker crust (or make your own from scratch)
- 1 box (3 oz) of strawberry-flavored Jell-O
- 1 box (3 oz) of lime-flavored Jell-O
- 2 cups boiling water (divided one per flavor of Jell-O)
- 2 cups cold water (divided one per flavor of Jell-O)
- 2 cups whipped topping (such as Cool Whip, thawed)
- Easter-themed sprinkles or edible decorations (optional)
Instructions
1: Prepare Your Jell-O Layers
- Bring 2 cups of water to a boil.
- Dissolve the strawberry Jell-O mix in 1 cup of boiling water. Stir thoroughly for two minutes to ensure it’s fully dissolved.
- Add 1 cup of cold water and mix.
- Repeat the above process for the lime Jell-O in a separate bowl.
- Allow both flavors of Jell-O to cool to room temperature. (Tip: Do not refrigerate them yet as they might start to set too soon.)
2: Create the Creamy Base
- Divide your whipped topping into two bowls.
- Once the Jell-O has cooled, slowly mix half of the strawberry Jell-O into one bowl of whipped topping using a whisk. Repeat the process with the lime Jell-O in the other bowl of whipped topping. These mixtures will be your creamy Jell-O filling.
3: Assemble Your Pie
- Pour the creamy strawberry mixture into the graham cracker crust, spreading evenly.
- Carefully pour the creamy lime mixture on top of the strawberry layer. Use a spatula to smooth the surface.
- For a more festive touch, sprinkle Easter-themed decorations or pastel sprinkles on top of the pie.
4: Chill Your Masterpiece
Refrigerate the pie for at least 4 hours, or until the layers are fully set. This wait time ensures that the pie will slice cleanly and maintain its shape.
5: Serve and Impress
Slice the pie into even portions and serve to your guests. Watch their faces light up as they enjoy this colorful, creamy delight!
Expert Tips & Tricks for the Perfect Jell-O Pie
- Avoid Oversaturation: When mixing Jell-O with the whipped topping, add the Jell-O slowly to ensure it incorporates smoothly. This prevents clumping and uneven textures.
- Homemade Graham Cracker Crust: Want to go the extra mile? Make your crust by mixing 1.5 cups of crushed graham crackers with ⅓ cup melted butter and 3 tablespoons sugar. Press the mixture firmly into a pie pan and chill for 30 minutes before adding the filling.
- Layer Precision: To keep layers neat and clean, refrigerate each creamy Jell-O layer for 15–20 minutes before adding the next. This ensures the colors stay distinct.
- Presentation Matters: Consider using piped whipped cream, edible flowers, or chocolate decorations to make the pie extra Instagram-worthy!
- Keep It Cool: Always keep the pie refrigerated until it’s time to serve. Jell-O pies can begin to soften if left out for extended periods.
Exciting Variations to Try
While the traditional strawberry and lime combination is a favorite, the beauty of the Easter Jell-O Pie lies in its flexibility. Here are a few exciting variations you can experiment with to truly make this dessert your own:
- Tropical Twist: Swap out the strawberry and lime Jell-O for pineapple and coconut-flavored Jell-O. Add shredded coconut as a topping for a refreshing tropical flair.
- Berry Bonanza: Use a mix of blueberry and raspberry Jell-O for a rich, fruity flavor. Garnish with fresh berries for an added touch of elegance.
- Citrus Splash: Combine orange and lemon Jell-O for a zesty, citrusy combination. Add candied orange peels or a sprinkle of lemon zest on top for a flavorful finish.
- Pastel Perfection: Use pastel-colored variations like peach, mango, or cotton candy Jell-O to create a softer, more delicate color palette for spring. It’s a beautiful option for Easter brunch or tea parties.
- Chocolate Dream: To add a chocolatey twist, mix in a layer of chocolate pudding or mousse between the Jell-O layers. Top with chocolate shavings for a decadent take on the classic.
- Individual Servings: Instead of one large pie, create mini Jell-O pies or parfaits in small jars or dessert cups. They’re perfect for portion control and make for an adorable presentation!
These creative ideas ensure that every Easter gathering has a unique dessert centerpiece that guests will rave about. Don’t be afraid to mix and match flavors or customize toppers to suit your taste and style!
Why the Easter Jell-O Pie is Perfect for Any Celebration
The Easter Jell-O Pie isn’t just a treat—it’s an experience. Its dazzling colors brighten any holiday table, and its creamy texture provides a satisfying dessert for all ages. With so many flavor options and customization possibilities, the Jell-O Pie effortlessly ties together tradition and innovation, making any celebration—whether small or grand—more memorable.
From the laughter shared during its preparation to the joy of the first bite, this dessert brings people together, embodying the spirit of Easter and creating cherished memories for everyone around the table.
Creative Variations for Your Easter Jell-O Pie
Want to take your pie-making game to the next level? Here are a few fun twists:
1. Triple-Layer Delight
Add a third Jell-O flavor (e.g., lemon or mango) to your pie for an extra colorful, flavorful boost.
2. Swirl Effect
Instead of layering, lightly pour a second color into the first to create a marbled swirl design. Use a toothpick or skewer to gently swirl the colors together.
3. Floral Infusion
Place edible flowers (like pansies or violets) on top of the creamy lime layer before it sets to enhance the pie’s whimsical springtime theme.
4. Chocolate Crust
Substitute the graham cracker crust with a chocolate cookie crust for a rich, bold flavor.
5. Festive Shapes
Instead of a pie, use silicone Easter-themed molds (bunny or egg shapes) to set your Jell-O mixtures. These individual servings are perfect for kids’ parties!
Celebrate Easter with Jell-O Joy
An Easter Jell-O Pie is more than just a dessert—it’s a centerpiece, a conversation starter, and an expression of love for family and tradition. By following the steps, tips, and variations outlined in this guide, you’ll soon be creating a treat that delights your loved ones and adds a burst of color to your Easter table.
What’s even better? This pie isn’t limited to Easter—it’s versatile and customizable for any celebration.
Are you ready to create your first Jell-O masterpiece? Share your finished dessert on social media and tag us—we’d love to see your creations!
Frequently Asked Questions about Jell-O Pie
Here are answers to some common queries to help ensure your Jell-O Pie turns out perfectly every time!
1. Can I use sugar-free Jell-O?
Absolutely! Sugar-free Jell-O works just as well in this recipe and is a great option for those looking to reduce sugar intake. The colors and flavors remain just as vibrant and delicious.
2. How far in advance can I make the pie?
You can prepare your Jell-O Pie up to two days in advance. Just be sure to keep it covered in the refrigerator to maintain freshness and prevent it from drying out.
3. What should I do if the layers don’t set properly?
If the layers are runny or don’t set as expected, it may be due to improperly dissolved Jell-O or insufficient refrigeration time. Always dissolve the Jell-O completely in boiling water and allow extra setting time if needed when refrigerating.
4. Can I substitute the whipped topping?
If you prefer fresh whipped cream over store-bought whipped topping, you can whip heavy cream with a bit of powdered sugar to stiff peaks. Just keep in mind that fresh whipped cream is less stable, so the pie should be consumed within a day.
5. What other crusts can I use?
Apart from graham cracker and chocolate cookie crusts, you can experiment with options like pretzel crusts for a salty-sweet twist or vanilla wafer crusts for a more delicate flavor.
6. Can I make a dairy-free version of the pie?
Yes! For a dairy-free version, use a non-dairy whipped topping alternative and ensure that your graham cracker crust or cookie crust is also dairy-free. Plant-based milk can be used for other recipes or variations if needed, but generally, the Jell-O mixture itself is dairy-free.
7. How can I store leftovers?
Leftover Jell-O Pie should be stored in an airtight container or covered tightly with plastic wrap. Keep it in the refrigerator and consume it within 2-3 days for the best taste and texture. Avoid freezing, as it can affect the creamy consistency of the filling.
8. Can I add fruit to the layers?
Absolutely! Adding fruit like sliced strawberries, kiwi, or mandarin oranges between the layers or as a topping can add a refreshing twist to your pie. Just ensure the fruit is patted dry before incorporating it to avoid excess moisture.
Conclusion
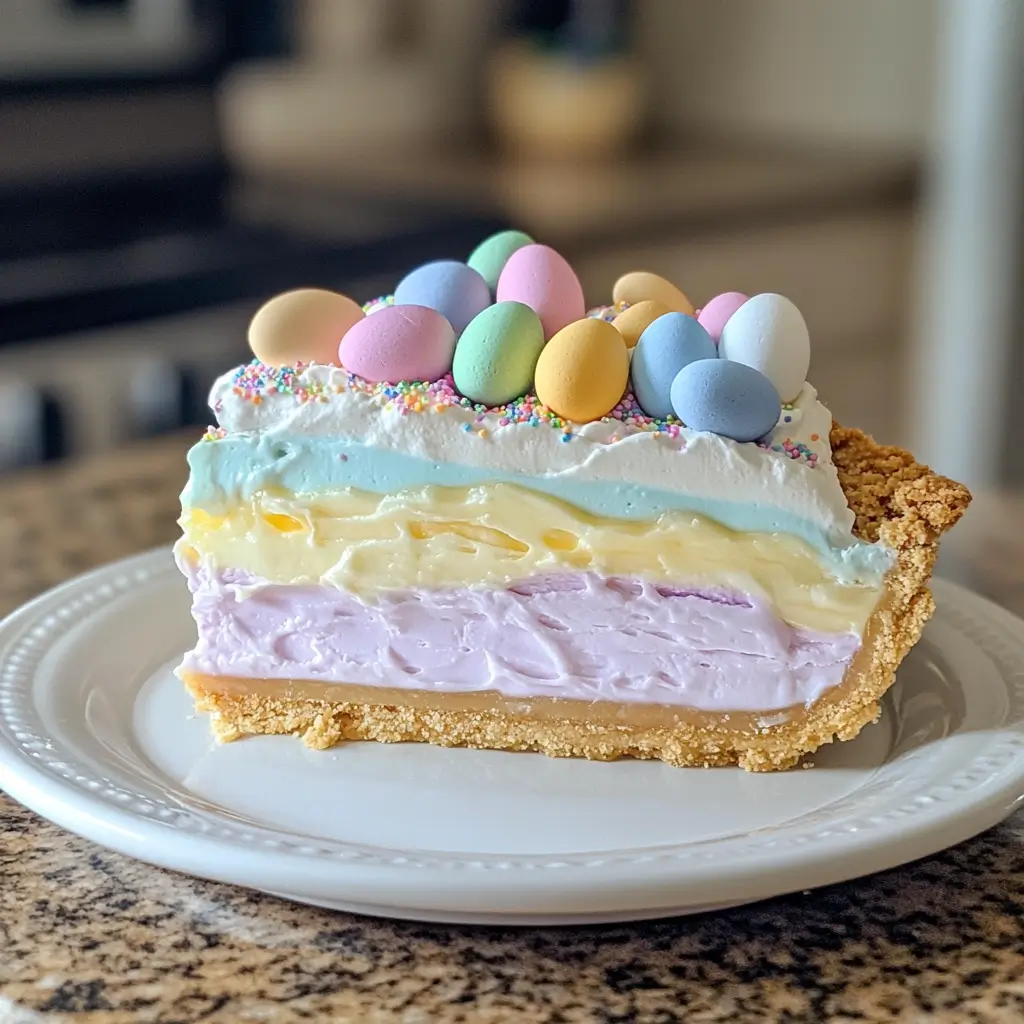
This Easter Jell-O Pie is the perfect no-bake dessert for spring celebrations! With its creamy, pastel layers, buttery graham cracker crust, and festive toppings, it’s sure to be a hit at any Easter gathering.
Not only is this pie easy to make, but it’s also customizable—swap out Jell-O flavors, add fun decorations, or even make mini versions for individual servings. Best of all, you can make it ahead of time, so you can relax and enjoy the holiday with family and friends.
So if you’re looking for a bright, fun, and kid-approved Easter treat, this Easter Jell-O Pie is a must-try!